Python Flask Microservice: API Gateway & Consul
About API Gateway
API Gateway acts as a single entry point for all clients and handles the request routing, composition, and protocol translation in a microservices architecture, here I will create a API Gateway using Python Flask and requests library, to route both “user” and “order” services.
Here I will create an API Gateway to handle the 2 services (user and order). By importing the requests module, which allows us to send HTTP requests in Python. It’s used for making API calls to other services.
Then with route decorator to specify that the get_users function should handle requests to the /users URL endpoint.
Then define response to send GET request to the user-service and order-service running on port 5001/5002 at each endpoint.
# Folder Structure
03-with-api-gatway/
├── user_service/
│ ├── Dockerfile
│ └── user_service.py
├── order_service/
│ ├── Dockerfile
│ └── order_service.py
├── api_gateway/
│ ├── Dockerfile
│ └── api_gateway.py
├── docker-compose.yml
# api_gateway.py
from flask import Flask, jsonify
import requests
app = Flask(__name__)
@app.route('/users')
def get_users():
response = requests.get('http://user-service:5001/users')
return jsonify(response.json())
@app.route('/orders')
def get_orders():
response = requests.get('http://order-service:5002/orders')
return jsonify(response.json())
if __name__ == '__main__':
app.run(host='0.0.0.0', port=5000)
# Dockerfile_apigateway
# Use an official Python runtime as a parent image
FROM python:3.9-slim
# Set the working directory in the container
WORKDIR /app
# Copy the current directory contents into the container at /app
COPY . /app
# Install flask requests
RUN pip install --no-cache-dir flask requests
# Make port 5000 available to the world outside this container
EXPOSE 5000
# Define environment variable
ENV FLASK_APP=api_gateway.py
# Run api_gateway.py when the container launches
CMD ["flask", "run", "--host=0.0.0.0", "--port=5000"]
# update docker-compose.yaml
.....
api-gateway:
build:
context: .
dockerfile: Dockerfile_apigateway
ports:
- "5000:5000"
# run docker-compose up --build
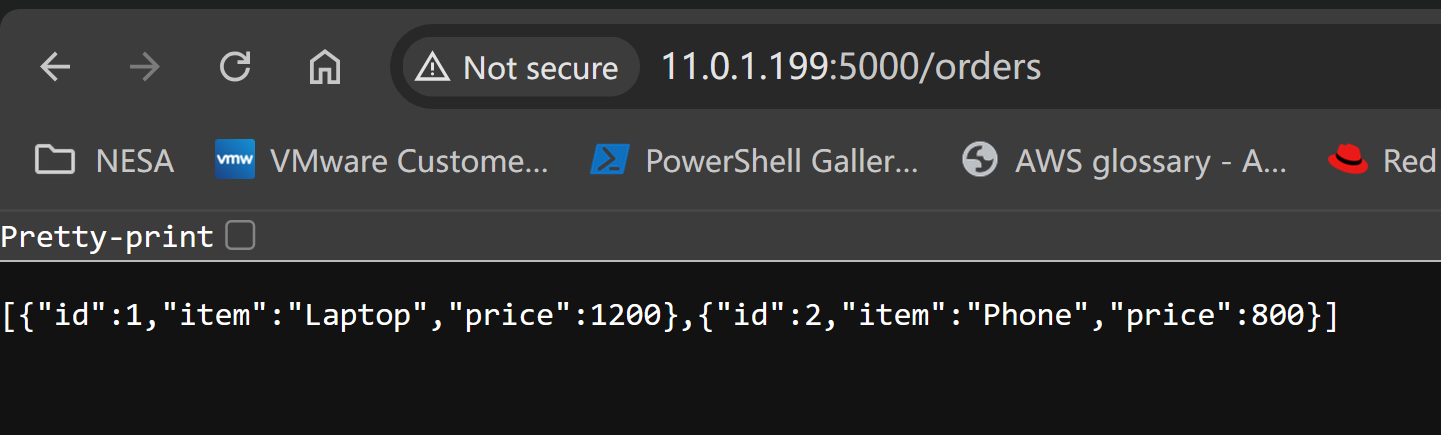
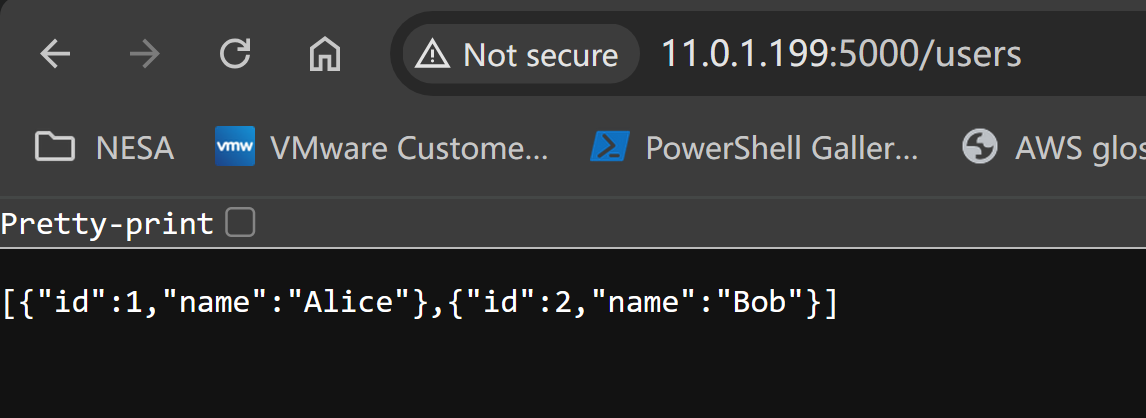
docker-compose up --buildVerify the 2 services can be accessed via API Gateway address and port plus /users and /orders by defining request functions.
About Consul
Consul is a popular open-source tool for service discovery and service registration, here I will update the py files to register both services with Consul
In both user_service.py and order_service.py, add service registration logic.
To import time module, also define function named register_service that will handle the service registration logic with Consul, use dictionary defines the payload for the service registration. It includes the service ID, name, address, and port.
I will use while True to start an infinite loop, which will keep trying to register the service with Consul until it succeeds, add try, elseand if to handle exceptions during the registration process.
# vim order_service.py
import requests
from flask import Flask, jsonify
import time

app = Flask(__name__)

@app.route('/orders')
def get_orders():
 orders = [
 {'id': 1, 'item': 'Laptop', 'price': 1200},
 {'id': 2, 'item': 'Phone', 'price': 800}
 ]
 return jsonify(orders)

def register_service():
 payload = {
 "ID": "order-service",
 "Name": "order-service",
 "Address": "order-service",
 "Port": 5002
 }
 while True:
 try:
 response = requests.put('http://consul:8500/v1/agent/service/register', json=payload)
 if response.status_code == 200:
 print("Successfully registered order-service with Consul")
 break
 else:
 print(f"Failed to register order-service with Consul, status code: {response.status_code}")
 except requests.exceptions.RequestException as e:
 print(f"Error registering order-service with Consul: {e}")
 time.sleep(5)

if __name__ == '__main__':
 print("Registering order-service with Consul")
 register_service()
 app.run(host='0.0.0.0', port=5002)


# vim user_service.py
import requests
from flask import Flask, jsonify
import time

app = Flask(__name__)

@app.route('/users')
def get_users():
 users = [
 {'id': 1, 'name': 'Alice'},
 {'id': 2, 'name': 'Bob'}
 ]
 return jsonify(users)

def register_service():
 payload = {
 "ID": "user-service",
 "Name": "user-service",
 "Address": "user-service",
 "Port": 5001
 }
 while True:
 try:
 response = requests.put('http://consul:8500/v1/agent/service/register', json=payload)
 if response.status_code == 200:
 print("Successfully registered user-service with Consul")
 break
 else:
 print(f"Failed to register user-service with Consul, status code: {response.status_code}")
 except requests.exceptions.RequestException as e:
 print(f"Error registering user-service with Consul: {e}")
 time.sleep(5)

if __name__ == '__main__':
 print("Registering user-service with Consul")
 register_service()
 app.run(host='0.0.0.0', port=5001)

# update docker-compose.yaml

version: '3'
services:
 consul:
 image: consul:1.15.4
 ports:
 - "8500:8500"

 user-service:
 build:
 context: ./user_service
 depends_on:
 - consul
 environment:
 - CONSUL_HTTP_ADDR=consul:8500
 ports:
 - "5001:5001"

 order-service:
 build:
 context: ./order_service
 depends_on:
 - consul
 environment:
 - CONSUL_HTTP_ADDR=consul:8500
 ports:
 - "5002:5002"

 api-gateway:
 build:
 context: ./api_gateway
 depends_on:
 - consul
 - user-service
 - order-service
 environment:
 - CONSUL_HTTP_ADDR=consul:8500
 ports:
 - "5000:5000"
Now run the docker-compose and verify in Consul via localhost:
docker-compose up --build

Creating 04-with-consul_consul_1 ... done
Creating 04-with-consul_user-service_1  ... done
Creating 04-with-consul_order-service_1 ... done
Creating 04-with-consul_api-gateway_1   ... done

consul_1         | 2024-05-18T14:28:45.465Z [DEBUG] agent: Node info in sync
consul_1         | 2024-05-18T14:28:45.465Z [DEBUG] agent: Service in sync: service=order-service
consul_1         | 2024-05-18T14:28:45.465Z [DEBUG] agent: Service in sync: service=user-service
Conclusion
Now we can use API gateway and Consul to manage route and service discovery.
In the next post, I will see how to enable logging with ELK stack and monitoring with Prometheus and Grafana stack.